


The benefits of twine can hardly be overestimated, there are almost no contraindications for its implementation, except for acute inflammatory processes in the abdominal organs, spine, during pregnancy (a lightweight form of twine is performed). If you sit on the twine incorrectly, you can only harm the body. It is very important to properly prepare your body for the twine (it will take from six months to a year). In addition, it is recommended not to sit on the longitudinal or transverse twine without first warming up the muscles. Read on estet-portal.com.
The benefits of twine for the body
When performing the splits, the spine must be fixed in a physiologically correct position, it is necessary to monitor the correct stretching of the muscles and the correct position of the joints. Only in this case, the body will exhaust all the power of positive action from the twine.
The depth of the twine is carried out with an increase in the mobility of the hip bones, joints, and also the sacrum. Due to the correct position of the spine and pelvis, blood circulation in the abdominal organs improves. Urogenital or intestinal ailments occur less frequently. The work of the intestines and duodenum is stimulated, the spine is stretched and any pathological processes in the column are prevented. The benefits of stretching and twine for getting rid of fat deposits on the legs are enormous. Moreover, twine will help to establish a monthly cycle and reduce pain during menstruation. Gynecologists recommend that couples who want to conceive a child as soon as possible, do stretching exercises and sit on the twine more often to train the genitals.
Mastering the twine is worth it slowly and persistently, only the strict implementation of the correct stretching exercises will help open the chest and pelvis, increase the range of motion of the joints.
Read also: Yoga to help: exercises for a flat stomach
Basic stretching exercises: splits without problems
Exercise #1 – Deflection at wide stop
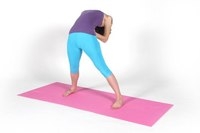
Stand up straight with about a meter between your feet. Feet are parallel and knees point forward. Place your palms on the sacrum. As you inhale, bend back, stretch the top of your head down and your ribs up. Point your shoulder blades and shoulders down, do not pinch your neck. Keep your feet up and breathe freely. Stay in position for 30 seconds.
Exercise #2 – Tilt parallel to the floor
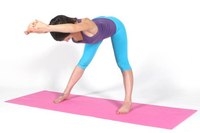
Without changing the initial position of – standing more than a meter wide between the legs. Raise your hands as you inhale and clasp them over your head. As you exhale, lean forward so that your torso is parallel to the floor. The back should be flat when tilted, as should the arms. Turn your pelvis back. Hold the pose for 30 seconds.
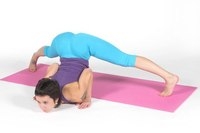
Exercise №3 –Deep tilt, leaning on the palms
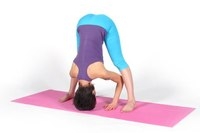
Home position does not change – as in previous exercises. Relax your back and as you exhale, lower yourself into a slope. Place your palms between your feet and bend your arms at the elbows. If it is difficult to bend your arms, place bricks under your palms. Place your head on the floor, resting on your palms. Pull the pelvis up, twisting the bones outward. Hold the pose for 1 minute.
Exercise #4 – Deep tilt, leaning on the forearms
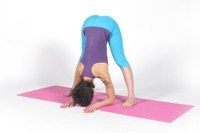
It is performed under the condition that in the previous position it was possible to place the palms on the floor, without bricks. Deepen the pose and, when bending over, shift the weight of the body onto the forearms. Elbows should be in line between feet.
Exercise #5– Squat and stretch
Stand straight and spread your legs apart. Perform a squat on the exhale, while spreading your knees to the sides, stretch your arms forward. The back should be parallel to the floor. Look at the floor, take your socks to the sides. As you inhale, straighten your back and legs, raise your arms and stretch up. Perform 10 tilts.
More stretching exercises: Full body stretch – and no pain from muscle strain
Exercise #6 – "Stupa Pose"
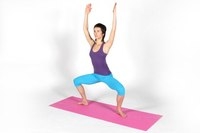
Remain in the starting position as in the previous exercise and raise your arms above your head. As you exhale, lower yourself into a squat and spread your knees to the sides. Do not bend your back, it should be flat. Pull your arms up, and rush your shoulders down. Hold the pose for 30 seconds.
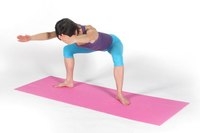
Exercises #7 – Side lunges
Place your feet parallel and stand straight. Bend over and place your palms near your feet or on your legs. As you exhale, slowly bend your left leg, and your right – straighten. On an inhale, return to the starting position. Then do everything on the other side. If lunges work without problems, place your hands on your ankles and bend even more, approaching the floor. Perform 10 lunges to each side.
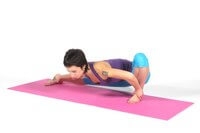
Exercise #8 – Wide push-ups
Spread your legs as far as you can, resting on your palms. While inhaling, push up, bend your elbows and lower your chest to the floor. Pull your pelvis up and keep your body weight on your toes. As you exhale, straighten your arms and raise your chest, transferring body weight to the foot. Perform 10 push-ups.
How to do a cross split
Coming out of the previous pose, lean on your feet and lower your legs and crotch to the floor. In addition, you can lower your stomach to the floor, resting on your palms or forearms. Rest on your heels so that your socks look up, straighten your back. Do everything slowly, without feeling uncomfortable.
Stretching exercises will help you achieve deep and beautiful twine with maximum benefit for the body. From the first days it will not be possible to make twine. Training can take from a month to a year to get a deep full-fledged transverse split.
Add a comment