


Water – wonderful healer. It removes dirt, relieves fatigue and stress, and also relaxes and makes the mind clearer. In general, it heals the soul and body. It works especially effectively in tandem with yoga or aqua yoga, which fills a person with vitality and confidence. It is this direction that is now on the wave of popularity. It is practiced all over the world, both by experienced yogis and beginners. In this material, estet-portal.com will tell you how to master some simple and important yoga asanas in the water.
Breathing technique: an important component of yoga asanas
Proper breathing allows you to accumulate more energy in yourself when pushing out air during the exercise. Therefore, before you start mastering asanas, master this technique. As practice shows, it is better to do this in a pool at a shallow depth.
Breath – the key point on which the effectiveness of the lesson and the very tactics of swimming depend.
It is necessary to breathe in aqua yoga as follows: inhalations are made through the mouth above the water, and exhalations – into the water through the nose. With inverted asanas, you need to master the technique of holding your breath under water. It is very easy to master this technique:
• inhale through your mouth over water;
• dive in and hold your breath as long as possible;
• focus on the third eye;
• exhale through the nose;
• float to the surface;
• rest for a few minutes;
• with each successive time, try to linger in the water longer and longer until confidence and calmness appear;
• do this exercise for 5-7 minutes.
Having mastered such a simple breathing technique, You will develop your alertness and awareness. Then you can begin to master the yoga asanas themselves in the water. Beginners should start with the "from simple to complex" scheme.
Mountain Pose (Tadasana) – basis of aqua yoga postures
This exercise is performed as follows: in a standing position, place your feet together, straighten your legs. The kneecaps should reach upwards. Make sure that the socks do not move apart, the body is even, the chest rises up and opens, and the neck – straightened up. Also, do not allow the chin to rise and the lower back to fall forward. As for the position of the hands, there are 3 options:
1- First they are extended to the sides, then they are transferred upwards. In this version, the palms look at each other and stretch upward along with the whole body.
2- Lowered down and located on the sides of the body.
3- Palms folded in Namaste. This is a prayer mudra in which the palm is applied to the palm with the fingers pointing up.
When performing this asana, you need to breathe evenly. The exercise should take 30-60 seconds. Tadasana strengthens the abdominal muscles, improves overall tone, and improves posture.
Warrior Pose (Virabhadrasana): Strength, Confidence and Body Consciousness
First, you need to become a mountain pose, after which – raise your hands up above your head and connect them with your palms. Next, stretch your body and arms as high as possible. It is important not to take your feet off the floor. Then you need to take a deep breath and spread your legs with a jump, after which – exhale. Next, you need to turn the body along with the right and left feet to the right and bend the right leg at the knee. It is very important that her thigh is parallel to the floor, and the shin of her left leg – perpendicular. In this asana, the bent leg should be in line with the heel, and between the calf and thigh should "loom" right angle. Next, you need to strain the knee of the left leg and stretch the limb. It is important that the pelvis does not go to the side. And for this it needs to be well fixed. You can find out the correctness of the asana by the location of the face, chest and right knee. They "look" towards the right foot. Also, the head is thrown back up, the spine is extended, the gaze is directed to the palms, and the breathing is even. In this position, you need to linger for 20-30 seconds. Next, you should repeat all the movements from the moment of the jump, but only on the left side, after which you need to exhale and jump back to Tadasana. With the help of this yoga asana, the chest opens up, breathing becomes deep, and the buttocks and thighs – pull up.
the gaze is directed to the palms, and the breathing is even. In this position, you need to linger for 20-30 seconds. Next, you should repeat all the movements from the moment of the jump, but only on the left side, after which you need to exhale and jump back to Tadasana. With the help of this yoga asana, the chest opens up, breathing becomes deep, and the buttocks and thighs – pull up.the gaze is directed to the palms, and the breathing is even. In this position, you need to linger for 20-30 seconds. Next, you should repeat all the movements from the moment of the jump, but only on the left side, after which you need to exhale and jump back to Tadasana. With the help of this yoga asana, the chest opens up, breathing becomes deep, and the buttocks and thighs – pull up.
Chair Pose (Utkatasana): Benefits for Legs and Back
Tree Pose (Vrikshasana) – balance that gives wisdom and longevity
Home position – mountain pose. The arms are stretched out, pulled up with the body, and the feet, as it were, "take root"; into the ground. After that, the right leg is bent at the knee, and the foot is pressed against the inside of the left thigh. In this case, the heel is located near the perineum, and the fingers "look" way down. The knee is retracted to the side, without squeezing the toes of the supporting leg and abducting the pelvis to the side. You need to breathe evenly. In this position, you need to be a few seconds, and then increase the time again. This yoga asana relieves flat feet and bad posture. It also gives wisdom and prolongs life.
The first time you need to practice with an instructor. Performing the exercise incorrectly can lead to injury and other health problems.
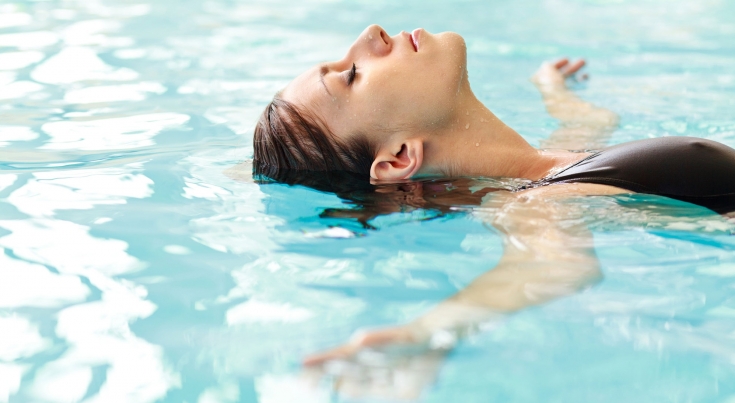
As for inverted yoga asanas such as forward bends and balance on the arms, shoulders and head, it is necessary to have the technique of holding the breath. Therefore, before you start practicing, be sure to master it. It is also good to meditate in the water
. Therefore, sit up to your neck in it, take the Lotus position and immerse yourself in yourself. End your Aqua Yoga workout in a relaxed position – Savasana. Lie on your back in the water, spread your arms and legs to the sides. Relax like this for about 10 minutes.
Read also: Yoga in hammocks: spiritual and physical practices at a height

Add a comment