


Age-related changes in the periorbital region are often accompanied by the appearance of a nasolacrimal groove, which gives the face a tired look and is a common cause of complaints in aesthetic clinics. This problem is quickly solved with the help of hyaluronic acid fillers, which provide a long-lasting effect by stimulating neocollagenesis, angiogenesis and adipocyte proliferation in the treated area. However, work in the area under the eyes is associated with a number of difficulties and risks due to anatomical features. Recommendations for effective and safe correction of the nasolacrimal sulcus in the article estet-portal.com are given by Dr. Javier Anido, José Manuel Fernández, Ignacio Genol, Natalia Ribé and Gema Pérez Sevilla.
- Age-related changes in the periorbital region
- Defect anatomy and patient selection for lacrimal trough correction
- Choice of filler for filling the nasolacrimal trough
- Technique for correction of the nasolacrimal trough with cannula
- Technique for correction of the nasolacrimal trough with a needle
- Basic rules for the safe use of hyaluronic acid fillers in the periorbital zone
Age-related changes in the periorbital region
The formation of the nasolacrimal sulcus is facilitated by age-related changes at the level of all layers of the periorbital region.
Skin:
- volume loss;
- decrease in the amount of collagen;
- deformation and decrease in elasticity of elastin fibers.
Fat:
- volume loss and omission of fat pads;
- redistribution, accumulation and atrophy of fat;
- vasodilatation of the dermis.
Muscles:
- contractions of the orbicular muscle of the eye, which lead to the appearance of fine wrinkles;
- loss of tone of the orbicular muscle of the eye;
- weakening of the orbito-zygomatic ligament.
Follow us on Facebook!
Bones:
- orbital dilatation: changes in the lower part of the
orbital ridge. Defect anatomy and patient selection for lacrimal trough correction
A number of anatomical structures are involved in the formation of the nasolacrimal sulcus (Fig. 1).
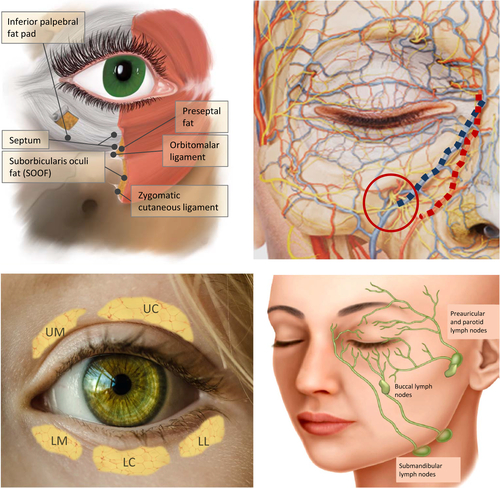
Upper left: anatomy of the periocular region
Top right: vessels and nerves – angular vein (blue), angular artery (red), infraorbital nerve exit point (red circle).
Bottom left: fat packs – superior medial (
UM), superior central (UC), inferior medial (LM), inferior central (LC) and inferior lateral (LL).
Lower right: periocular lymphatic drainage.Correction with hyaluronic acid fillers
good responsenasolacrimal trough if present:
excess fat in the lower palpebral fat pads;- weakened septum;
- lowering of the lower edge of the orbital ridge;
- excessive projection of the internal infraorbital fat caused by age-related tissue displacement, excess malar fat, or changes in muscle thickness;
- thinning of the skin or subcutaneous muscle tissue.
- However, it is important to differentiate between edema and the nasolacrimal trough, since the first defect is corrected in conjunction with the nasolacrimal trough or using a different approach.
Read also:
Anatomy and recommendations for filling the nasolacrimal trough with fillers The correction of the nasolacrimal trough implies
change in the volume and position of deep fat padsdepending on the etiology of the defect. Sometimes excess fat is localized in the lower palpebral fat pads and the septa is weakened. In this case, a good result can be obtained by tissue repositioning with hyaluronic acid fillers.
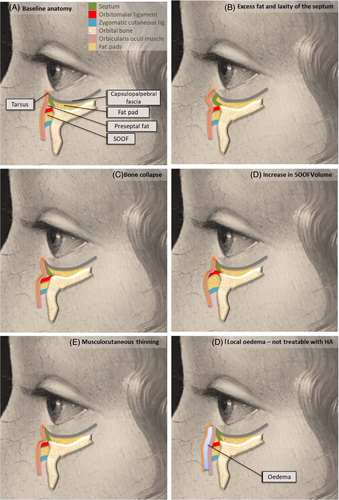
In fig. A shows the basic anatomy of the zone, in cases B–E correction can be done with a HA filler, in case of
F a different approach to correction is required. The
ideal candidatesfor nasolacrimal trough correction with hyaluronic acid filler are:
nasolacrimal sulcus is limited to the region of the lacrimal recess;- there is no hypertrophy of the orbicular muscle of the eye;
- no hyperpigmentation;
- there is a good elasticity and tone of the skin and muscles;
- palpebral sac is absent or not very pronounced;
- normal
- fluid outflow is maintained. Selecting a filler to fill the nasolacrimal trough
To avoid adverse events after nasolacrimal sulcus correction, the practitioner should understand the
filler propertieswhich are affected by the degree of crosslinking, particle size, HA concentration and other active substances that may be present in the formulation. The right choice of filler – an important factor in the successful correction of the nasolacrimal trough.
For example, the high degree of cross-linking and the large particle size of the hyaluronic acid filler provide a longer effect, but at the same time, such gels absorb a large amount of water and often lead to swelling after the procedure. It is expected that fillers with these characteristics are more likely to cause adverse events in the
periorbital region. Technique for correction of the nasolacrimal trough with cannula
Good results of nasolacrimal sulcus correction can be achieved with both cannula and needle. It is believed that the cannula is safer to work in the periorbital zone with a rich network of vessels, nerves, muscle and fat structures.
Read also:
Lacrimal trough fillers: simple and effective
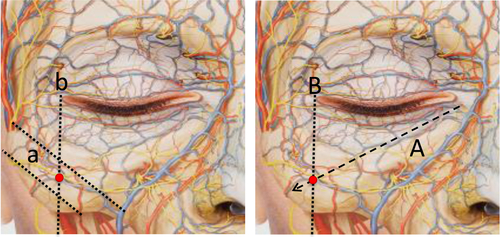
There are 2 ways to define the cannula entry point:indicate the point at which the projection line of the nasopharynx intersects with a perpendicular line drawn from the corner of the eye;
- mark a point on a perpendicular line drawn from the corner of the eye, which is located between two lines that bound the upper and lower edges of the zygomatic bone.
Procedure sequence:
The skin is pierced with a 23G needle at a 90 degree angle to the skin, it is inserted deep into the tissues and then removed.
- The 25G or 27G cannula is inserted up to the periosteum.
- The cannula is rotated to a 45 degree angle and inserted gently towards the deepening of the nasolacrimal trough.
- HA is injected retrogradely until the furrow is smoothed, then the product is evenly distributed in the tissues by light massage.
ligament. Technique for correction of the nasolacrimal trough with a needle
It is recommended to use a 28 gauge needle with a length of 19 mm for work:
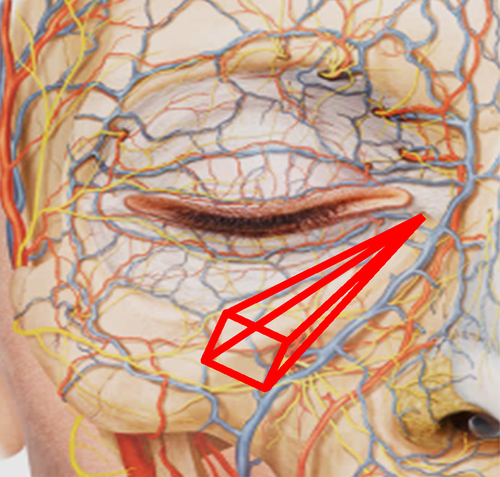
The location of the input points is shown in fig. 5. The needle is inserted perpendicular to the skin up to the periosteum.
- The needle is brought to a horizontal position so that it runs parallel to the underlying bone and slowly moved into the injection site.
- HA can be injected using the retrograde fan technique (Fig. 5) at bone level, under the orbicular muscle of the eye.
- If the patient needs to correct the palpebromalar grooves, the injection is made from the second needle entry point (Fig. 5).
- To distribute the filler, a light massage is performed.
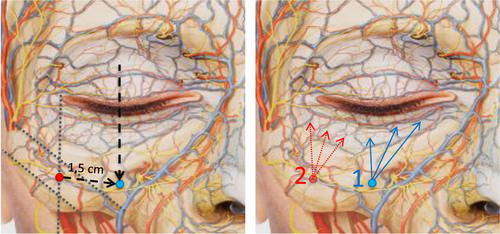
Left: The initial reference point (red) is located at the intersection of the lines indicated for the cannula in fig. 3. The point of entry of the needle (blue) is located in the direction of the projection of the mid-pupillary line, at a distance of approximately 1.5 cm diagonally, parallel to the orbital ridge.
Right: Needle is inserted at point 1, product is injected in a fanned linear retrograde tissue starting at the points marked with blue arrows. If it is necessary to correct the palpebromalar groove, the needle is inserted into point 2, and the drug is injected using the same technique from the points
marked with red arrows. Basic rules for the safe use of hyaluronic acid fillers in the periorbital area
Safety rules for nasolacrimal trough correction to be observed
when using any technique:
The hyaluronic acid filler should be injected deeply to avoid compression of the lymphatic vessels and the occurrence of the Tyndare effect.- The filler must be injected slowly.
- Excessive movements of the needle or cannula should be avoided to avoid severe tissue trauma.
- It is recommended to inject no more than 0.5 ml of hyaluronic acid filler into one furrow per session. Re-correction to improve the result can be done in a month.
- You may also be interested in:
Nasal trough filling: best cosmetic techniques Proper execution of the procedure in compliance with all safety rules will ensure a good result and patient safety.
Adapted from the Journal of Cosmetic Dermatology.
More interesting videos on our
YouTube-channel!