
Infiltration anesthesia – it is a type of anesthesia that physicians often encounter during their years of practice. Various techniques for infiltration anesthesia provide adequate pain relief and minimize risks to the patient, resulting in optimal results.
When choosing an anesthetic for infiltration anesthesia, consideration should be given to the type of procedure, the required duration of anesthesia, and the pharmacodynamics of each drug. estet-portal.com will tell you more about the techniques of infiltration anesthesia in this article.
Standard Infiltration Anesthesia Procedure
- According to the anatomy, select the technique for injecting the anesthetic.
- Take into account possible contraindications:
2.1. Absolute contraindications: patient refusal, injection site infection, allergy to local anesthetic, non-sterile conditions.
2.2. Relative contraindications: coagulopathy, target nerve neuropathy.
- Discuss the procedure with the patient, including expectations and possible complications, and obtain informed consent if necessary.
- Assess the surrounding area and area separated from the injection site for risks to nerves and vessels.
- Select and label the appropriate anesthetic based on the chosen technique and case; heat and buffer solutions as instructed.
- Clean the insertion site (for intact skin, alcohol wipes are as effective as chlorhexidine or povidone/iodine).
- Quickly insert a 27–30 gauge needle through the skin into the subcutaneous layer, using distraction techniques if necessary, aspiration is required prior to injection.
- Slowly and steadily inject a small amount of anesthetic while retracting the needle.
- Check if anesthesia works in the treated area.
Anesthetics used for infiltration anesthesia
|
Anesthetic |
Concentration |
start action* |
duration* |
maximum dose |
|
|
mg/kg |
ml |
||||
|
Amids |
|||||
|
Lidocaine (Xylocaine) |
0.5%, 1%, or 2%† |
Fast: < 2 min |
30-60 min. |
4 (up to 300 mg per dose) |
0.5%: 601%: 302%: 15 |
|
Lidocaine with Epiniphrine‡ |
1% or 2% |
Fast: < 2 min§ |
1-4 hours |
7 (up to 500 per dose) |
1%: 502%: 25 |
|
Bkpivakain (Marcain) |
0.25% or 0.5% |
Slow: 5 min. |
2-4 hours |
2 (up to 175 per dose) |
0.25%: 700.5%: 35 |
|
Esters |
|||||
|
Procaine (Novocaine) |
1% or 2% |
Average: 2-5 min. |
15-60 hours |
7 (up to 600 mg per dose) |
1%: 602%: 30 |
|
Tetracaine (Pantocaine) |
0.5% |
Slow: 5-10 min. |
2-3 hours |
1.4 (up to 120 mg per dose) |
24 |
*—The same for each substance concentration.
†—Higher concentrations do not provide additional anesthetic effect.
‡—Epinephrine concentration can be 1:100,000 or 1:200,000.
- —It may take up to 5 minutes for the epinephrine to start working.
Pain Relief
To reduce pain during anesthetic administration:
- uses a small needle (27-30 gauge);
- lightly clamp the skin near the injection site;
- slow and steady injection of the anesthetic while withdrawing the needle;
- buffering of lidocaine, especially with epinephrine, with sodium bicarbonate in a ratio of 9:1;
- Warming the solution to room temperature.
Existing techniques for infiltration anesthesia
Local skin infiltration
Injecting an anesthetic directly into the area to be anesthetized is suitable for small wounds or skin biopsies. This technique of infiltration anesthesia is most commonly used. Limitations: tissue deformity, inadequate anesthesia of surrounding areas, and risk of toxic effects if large amounts of anesthetic are administered.
REGIONAL ANESTHESIA
Regional anesthesia is performed in the case of infected wounds, skin abscesses, and when it is necessary to avoid tissue deformation (for example, along the red border of the lips). This technique is used to block the innervation of the area around the circumference. Often a square or diamond-shaped field is used (Fig. 1). The advantages of this technique of infiltration anesthesia are the duration of anesthesia and the ability to "customize" her under a clinical case. Among the limitations: the risk of toxic effects of large doses of anesthetic and lack of effectiveness in areas of complex innervation, such as the nose.
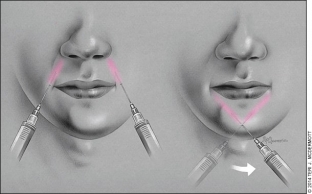
Fig.1.
Conduction anesthesia (nerve block)
The conduction anesthesia targets a specific nerve that provides sensation to a specific area. Most often, this infiltration anesthesia is used on the face and fingers.
Conduction anesthesia of the supraorbital and supratrochlear nerves. The supraorbital and supratrochlear nerves, which originate from the ophthalmic part of the trigeminal nerve (V1), innervate the forehead. The supraorbital nerve runs from the supraorbital foramen, which can be palpated about 2.5 cm from the midline of the face in line with the pupil (when the patient is looking straight ahead). The supratrochlear nerve is located approximately 1 cm from the center of the supraorbital notch along the ophthalmic ridge. These nerves can be blocked separately at indicative points. It is also possible to block both nerves by infiltrating 2-4 ml of anesthetic along the upper edge of the eyebrow. Complications of nerve blockage in the forehead include swelling, bruising, and periorbital bruising.
Infraorbital nerve conduction anesthesia. The infraorbital nerve branches from the maxillary portion (V2) of the trigeminal nerve and provides sensation from the lower eyelid to the upper lip. It enters the maxilla through the infraorbital foramen, also in line with the pupil (when the patient looks straight).
There are two approaches to blocking the infraorbital nerve (Figure 2). Extraoral blocking is performed by placing one finger on the lower edge of the orbit just above the infraorbital foramen and simultaneously inserting the needle 1 cm below the orifice from the upper side. Aspiration is recommended to avoid trapping an artery or vein.
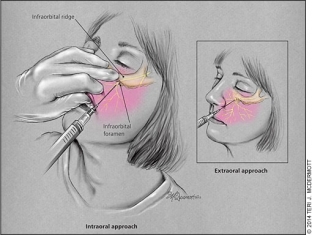
Rice. 2.
Intraoral blocking is performed as follows: the middle finger is placed on the lower border of the lower edge of the orbit to guide the needle. The patient's upper lip is grasped with the index and thumb, allowing the lip and cheek to be retracted. The needle is directed parallel to the longitudinal axis of the second premolar and passes in the direction of the infraorbital foramen. Before the introduction 1 – 3 ml of anesthetic must be aspirated, being careful not to go beyond the bony part of the orbit (about 2.5 cm) or enter the infraorbital foramen itself, so as not to damage the eyeball or nerves. The intraoral lock allows you to double the duration of anesthesia and use local anesthetic on the gums to reduce pain during the injection.
Conduction anesthesia of the mental nerve. Anesthesia of the lower lip and chin can be performed by blocking the mental nerve, which branches from the mandibular portion (V3) of the trigeminal nerve and exits from the mental foramen, which is located 1 cm below and slightly anterior to the second premolar. The mental nerve enters the mandible at a point in line with the pupil (when the patient is looking straight ahead). There is an extraoral and intraoral blockage of the mental nerve. The latter can be combined with local anesthesia.
Extraoral mental nerve block: The mental foramen is palpated outside the mandible. The needle is inserted perpendicular to the bone and injected into the periosteum. Then the needle is removed for 2 – 3 mm and 2 – 4 ml of anesthetic is injected near the mental foramen, but not directly into it (Fig. 3).
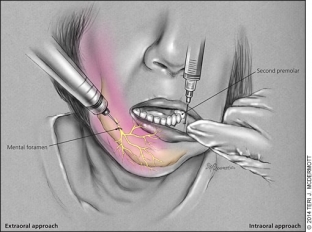
Rice. 3.
Intraoral mental nerve block: The lower lip is retracted with the thumb and forefinger, the needle is inserted at the junction of the lower lip and gum under the second premolar. Then 1 – 2 ml of anesthetic is injected near the chin hole. If the surgical site is located near the midline, a bilateral mental nerve block must be performed to ensure proper anesthesia.
Conduction anesthesia of the digital nerves. The dorsal digital nerves pass into the phalanges of the fingers at approximately 2 and 10 o'clock positions, and the palmar digital nerves – approximately 4 and 8 hours. Due to the sensory distribution of these nerves (Figure 4), only two palmar digital nerves are blocked in procedures involving the three middle fingers. If it is necessary to work with the thumb and little finger, it is necessary to block all four nerves. Nerves can be blocked in several places, but the area near the head of the metacarpal or metatarsal is the most convenient.
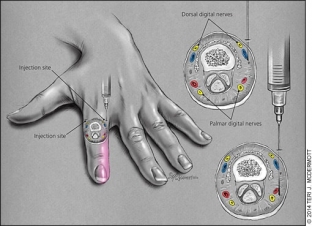
Rice. 4.
When blocking all four nerves of the phalanx, it is preferable to use the dorsal approach at the level of the interdigital space on the side of the proximal phalanx (Fig. 4). After penetration into the skin, subcutaneous injection of 0.5 – 1 ml of 1% lidocaine. The needle is then passed lateral to the phalanx until it reaches the palmar/plantar surface. Then, without piercing the palmar / plantar skin, another 0.05 – 1 ml of anesthetic. The procedure is repeated on the opposite side of the phalanx.
When blocking the palmar digital nerves in the middle three fingers, the anesthetic can be injected through a single point, but this method is more painful because it involves injecting the anesthetic into the palmar surface. The needle is inserted at a 45 degree angle to the skin just above the metacarpal head. The needle is inserted until it touches the bone. During the insertion of the needle, a small amount of anesthetic can be injected. After contact with the bone, the needle is slightly extended and directed 4 mm medially, and then 4 mm laterally – 0.5 ml of anesthetic is injected at both points.
Videos you might be interested in:
Share:


Add a comment